


Timelines are a frequently used, time-honored trial technique that we have discussed in these pages more than once. Since human beings like to focus on a story – what happened first, what happened next, and so on – timelines have the power to summarize, in a simple and straightforward way, the entire narrative of a case. But not all timeline graphics are created equal. Here are three ways to use what we call “top-bottom” timelines that most successfully take advantage of their power to persuade.
In the first type of “top-bottom” timeline, the chronological portion of the line, in years, months, days, whatever is relevant, sits in the middle. At the top lie the actions of your client, tagged at the appropriate time when they occurred. Below the line are the actions, or inactions, of the other side in the litigation. Let’s say the case centers around a construction contract, and your point is that a subcontractor’s inaction caused a critical delay in the completion of the contract. Above the line are the actions of your client, the main contractor – the days when it began work, when it completed certain key steps of the project, when it contacted the subcontractor for progress reports. Below the line are the actions of the subcontractor, which diminish in number and in significance as the deadline approaches. The jury can look at the timeline and immediately draw a distinction between your client’s actions (good and appropriate) and the other company’s actions (few and showing evidence of foot-dragging).
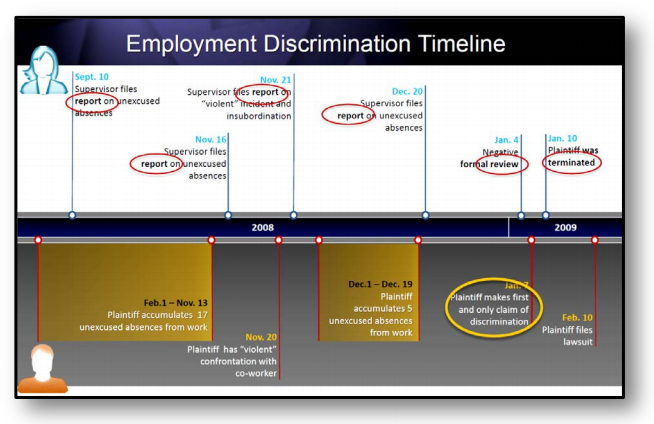
Another type of “top-bottom” timeline works very well when the issue is the extent to which a party had knowledge of some fact and the ability to control events. Suppose the case turns on when an automaker was aware of the possibility of a brake defect and what it did about it. In this case, we are an adverse party to the automaker. At the top of the timeline we might place all the instances in which a purchaser of a vehicle reported a brake problem, through a phone call, an email or some other means. Below the line are the actions of the automaker in response to the facts that the company learned. These could be efforts to correct the brake problem or internal, confidential emails that say the company is indifferent to the problem or finds it too expensive to fix. Again, by reading up and down the timeline at a particular point in time, a juror can see what the company knew, when it knew this, and what the response was.
Yet a third use of the timeline concept occurs when the issue is a party’s actual behavior vis-à-vis its promised behavior. Here as well, the top of the timeline will include all public promises to fix a problem, and the bottom of the timeline will indicate behavior that shows that the party was unable or unwilling to fix it. Different colors can point out the differences, say green above the line showing willingness and red below the line showing reluctance or obstructionism.
There are many twists and turns on the timeline concept, but over the years, we think these three ideas capture the best aspects of this technique.
Other free A2L Consulting articles about trial timelines, litigation graphics and persuading at trial with visual aids include:
- Free Download: The Litigator's Guide to Persuasive Trial Timelines
- Free 3 minute video: Three top litigators discuss persuasion using litigation graphics
- 5 Trial Graphics That Work Every Time
- How to Make PowerPoint Trial Timelines Feel More Like a Long Document
- 12 Ways to Eliminate "But I Need Everything On That PowerPoint Slide"
- Don't Be Just Another Timeline Trial Lawyer
- Trial Timelines and the Psychology of Demonstrative Evidence
- Don't Be Just Another Timeline Trial Lawyer


Leave a Comment